

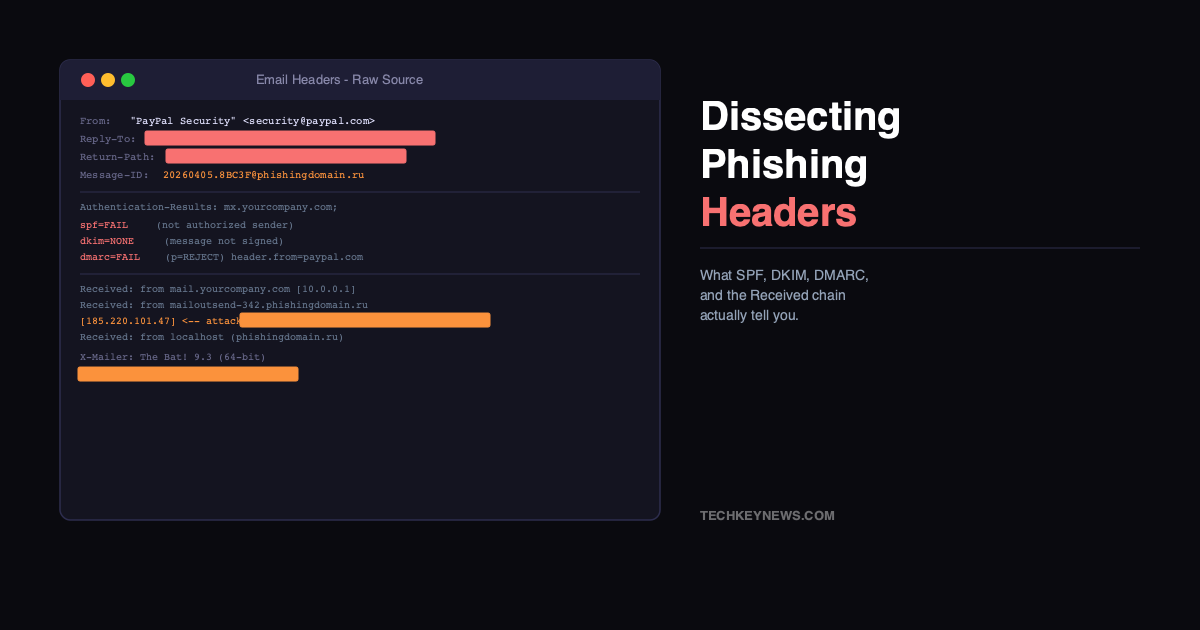
Most phishing training stops at “check the sender address.” That’s not enough anymore. The sender address in the From field is trivially spoofed and means almost nothing on its own. The real story is in the email headers — the routing metadata that gets appended as an email travels from the attacker’s server to your inbox.
I’ll walk through an actual phishing email header analysis, explaining what each section tells you and which parts actually matter for determining whether something is malicious.
Where to Find the Full Headers
Before anything else, you need the raw headers. In Gmail: open the email, click the three-dot menu at the top right, and select “Show original.” In Outlook: open the message, go to File > Properties, and look at the “Internet headers” box. In other clients, look for “View Source” or “Show Raw Message.”
The raw headers look intimidating at first — walls of encoded text and technical fields — but once you know what to focus on, most of it can be ignored.
Reading the Received Chain (Most Important Part)
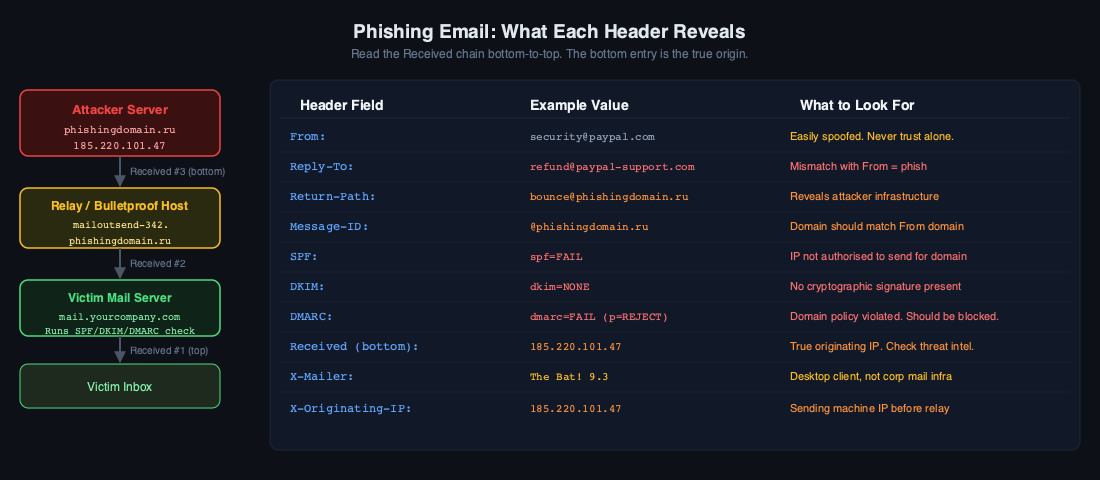
The Received headers form a chain showing exactly which servers your email passed through. Read them bottom to top — the bottom entry is where the email originated, and each entry above it is the next server that handled it. This is key because: the first server in the chain (bottommost Received header) is usually the attacker’s sending server, and it’s the one that can’t be forged.
Received: from mail.yourcompany.com (mail.yourcompany.com [10.0.0.1])
        by inbound-mx.yourcompany.com with ESMTPS
        at Mon, 14 Apr 2026 11:22:03 +0000

Received: from mailoutsend-342.phishingdomain.ru (unknown [185.220.101.47])
        by mail.yourcompany.com with ESMTP
        at Mon, 14 Apr 2026 11:22:01 +0000

Received: from localhost (localhost [127.0.0.1])
        by mailoutsend-342.phishingdomain.ru with ESMTP
        at Mon, 14 Apr 2026 11:21:58 +0000
Reading bottom-to-top: the email was sent from localhost on phishingdomain.ru, then relayed out through 185.220.101.47, then received by your mail server. That IP (185.220.101.47) is the true originating address. Check it against threat intelligence feeds — it’s often already flagged.
The Authentication Results Header
This is the single most useful header for phishing detection. Your receiving mail server runs three authentication checks and records the results here:
Authentication-Results: mx.yourcompany.com;
    spf=fail (domain of [email protected] does not designate 185.220.101.47
              as permitted sender) [email protected];
    dkim=none (message not signed);
    dmarc=fail (p=REJECT sp=REJECT dis=QUARANTINE) header.from=paypal.com
SPF (Sender Policy Framework): checks whether the sending IP is authorised to send mail for the domain in the Return-Path. An SPF fail means the email claims to be from paypal.com but was sent from an IP address that PayPal has explicitly not listed as an authorised sender.
DKIM (DomainKeys Identified Mail): a cryptographic signature added by the legitimate sending domain. “dkim=none” means there’s no signature at all — the message was never signed by paypal.com’s mail servers, which it would be if it were legitimate. If DKIM says “fail”, a signature exists but it doesn’t match, indicating the email was tampered with.
DMARC (Domain-based Message Authentication): a policy that says what to do when SPF or DKIM fails. “dmarc=fail” with p=REJECT means PayPal has published a policy saying “if something fails SPF and DKIM and claims to be from us, reject it.” The fact that it reached your inbox means your mail gateway didn’t enforce DMARC policy (common with misconfigured mail servers) or the attacker used a domain with no DMARC policy.
A legitimate PayPal email will always show: spf=pass, dkim=pass, dmarc=pass. All three failing simultaneously, especially on a domain that normally passes, is one of the strongest phishing indicators you can find.
The From vs. Return-Path Discrepancy
Phishing emails often show a discrepancy between the From header (what your email client displays) and the Return-Path or Reply-To header (where replies and bounces actually go).
From: "PayPal Security" <[email protected]>
Reply-To: [email protected]
Return-Path: <[email protected]>
The From header says paypal.com, but replies will go to paypa1-support.com (note the number “1” instead of the letter “l”). This is a classic social engineering technique — the victim sees a legitimate-looking sender but any response is harvested by the attacker. The Return-Path reveals the actual sending infrastructure.
X-Mailer and X-Originating-IP
Non-standard headers starting with “X-” are added by mail clients and servers. X-Mailer reveals the software used to compose and send the email. Legitimate business emails come from proper mail servers and usually don’t set X-Mailer. A value like:
X-Mailer: The Bat! 9.3.4 (64-bit)
X-Originating-IP: 185.220.101.47
…tells you this was sent using desktop email software on a specific IP rather than through PayPal’s legitimate mail infrastructure. The Bat! is a desktop email client often seen in Eastern European phishing operations. X-Originating-IP gives you the sending machine’s IP address before it hit any relay — same IP check applies here.
Message-ID Structure
The Message-ID is a unique identifier for the email. It has the format random-string@sending-domain. The domain in the Message-ID should match the From domain. If it doesn’t:
From: [email protected]
Message-ID: <[email protected]>
The Message-ID domain is phishingdomain.ru, not paypal.com. This confirms the email was generated on the attacker’s server rather than PayPal’s infrastructure. It’s a subtle indicator that’s easy to miss but tells you exactly where the email was created.
Timestamp Analysis
Look at the timestamps in the Received chain. They should increase chronologically from bottom to top. Large gaps (more than a few minutes) between Received headers can indicate the email was held on an intermediate server — sometimes because it was queued at a bulletproof hosting provider, sometimes because spam filters were checking it. An email that sat in a queue for two hours before being delivered is unusual. Check the Date header too — some phishers forge it to make emails appear older, hoping to bypass time-based detection rules.
Putting It Together: IOCs from Headers
From a single phishing email’s headers, you can extract:
- The sending IP address — from the bottom-most Received header or X-Originating-IP. Block it, submit it to threat intel feeds.
- The sending infrastructure domain — from Return-Path and Message-ID. The registrar and hosting provider can be notified for takedown.
- Authentication failures — proof that the domain was spoofed, useful for incident reports.
- The reply-to domain — where credential harvesting happens, another domain for takedown.
- Timing information — when the attacker’s infrastructure was active, useful for correlating other phishing campaigns.
The headers won’t tell you everything — they won’t tell you about malicious attachments or linked URLs — but they establish the infrastructure behind the attack. Combined with URL analysis and attachment sandboxing, header analysis gives you a comprehensive picture of the phishing operation.



Leave a Reply